/etc/rc.d/rc.local ファイルを開いて修正する。
下記の1行を加える
/opt/lampp/lampp start
ファイルを保存後再起動させる。
2012年4月21日土曜日

ASUS Eee PC 4GにPuppy Linux とandroid-x86を同居
Android も使いたくなったのでインストールしてみた。
Puppy Linux をインストールした時からandroid-x86の場所は一応確保しておいた。

android-x86 のインストール方法は
asus eee pc 4G にアンドロイドをインストールで少し書いた。
最初にPuppy Linuxをインストールした。
次に、android-x86をインストールした。
ブートローダーも一緒にインストールした。
再起動してもブートローダのメニュにはAndroidしかないので、
Puppy Linux をUSBメモリからインストールした時のUSBメモリを使ってハードディスクにインストールしたPuppy Linux を起動させる。

Puppy Linuxが起動したらブートローダをインストールする。
 ブートローダをインストールしたら、設定ファイルを修正する、
設定ファイル
/mnt/home/menu.lst
# menu.lst produced by grb4dosconf
color white/blue black/cyan white/black cyan/black
timeout 10
default 0
title pup-431JP
find --set-root --ignore-floppies /puppy431/initrd.gz
kernel /puppy431/vmlinuz pmedia=atahd psubdir=puppy431
initrd /puppy431/initrd.gz
title Android-x86 4.0-RC1
root (hd0,2)
kernel /android-4.0-RC1/kernel quiet root=/dev/ram0 androidboot.hardware=eeepc acpi_sleep=s3_bios,s3_mode SRC=/android-4.0-RC1
initrd /android-4.0-RC1/initrd.img
title Android-x86 4.0-RC1 (Debug mode)
root (hd0,2)
kernel /android-4.0-RC1/kernel root=/dev/ram0 androidboot.hardware=eeepc acpi_sleep=s3_bios,s3_mode DEBUG=1 SRC=/android-4.0-RC1
initrd /android-4.0-RC1/initrd.img
title Grub4Dos commandline\n(for experts only)
commandline
title Reboot computer
reboot
title Halt computer
halt
参考
android-x86 をインストールした時のブートローダの設定ファイルが、
/mnt/sda3/grub/menu.lst にあったのでそれをそのままコピーして使った。
これで、ブートローダが起動して、Puppy Linux とAndroidを選択できるようになった。

Puppy Linux をインストールした時からandroid-x86の場所は一応確保しておいた。

android-x86 のインストール方法は
asus eee pc 4G にアンドロイドをインストールで少し書いた。
最初にPuppy Linuxをインストールした。
次に、android-x86をインストールした。
ブートローダーも一緒にインストールした。
再起動してもブートローダのメニュにはAndroidしかないので、
Puppy Linux をUSBメモリからインストールした時のUSBメモリを使ってハードディスクにインストールしたPuppy Linux を起動させる。

Puppy Linuxが起動したらブートローダをインストールする。

設定ファイル
/mnt/home/menu.lst
# menu.lst produced by grb4dosconf
color white/blue black/cyan white/black cyan/black
timeout 10
default 0
title pup-431JP
find --set-root --ignore-floppies /puppy431/initrd.gz
kernel /puppy431/vmlinuz pmedia=atahd psubdir=puppy431
initrd /puppy431/initrd.gz
title Android-x86 4.0-RC1
root (hd0,2)
kernel /android-4.0-RC1/kernel quiet root=/dev/ram0 androidboot.hardware=eeepc acpi_sleep=s3_bios,s3_mode SRC=/android-4.0-RC1
initrd /android-4.0-RC1/initrd.img
title Android-x86 4.0-RC1 (Debug mode)
root (hd0,2)
kernel /android-4.0-RC1/kernel root=/dev/ram0 androidboot.hardware=eeepc acpi_sleep=s3_bios,s3_mode DEBUG=1 SRC=/android-4.0-RC1
initrd /android-4.0-RC1/initrd.img
title Grub4Dos commandline\n(for experts only)
commandline
title Reboot computer
reboot
title Halt computer
halt
参考
android-x86 をインストールした時のブートローダの設定ファイルが、
/mnt/sda3/grub/menu.lst にあったのでそれをそのままコピーして使った。
これで、ブートローダが起動して、Puppy Linux とAndroidを選択できるようになった。

2012年4月20日金曜日
apacheのユーザーディレクトリの設定
/opt/lampp/etc/httpd.conf を開いて設定する。
475行あたの下の行を見つけて#を外す
# User home directories
Include etc/extra/httpd-userdir.conf
/opt/lampp/etc/extra/httpd-userdir.conf を開いて修正する
Puppy Linuxにはユーザーとか無いみたいなので、
自分でルートの下にhomeディレクトリを作って、その中に、
ユーザーディレクトリを作ってその中にpublic_htmlディレクトリを作って、
その中にindex.hemlとかを作っておく。
アクセスするには、
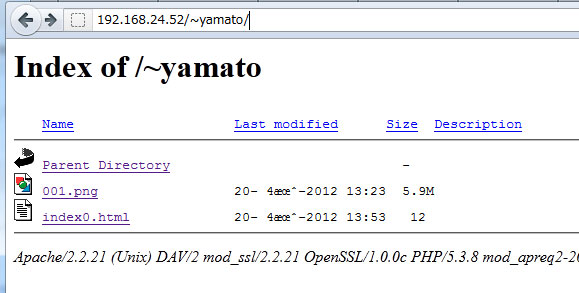
http://127.0.0.1/~ユーザーディレクトリ/ と入力する。
他のPCからもアクセスできた。

475行あたの下の行を見つけて#を外す
# User home directories
Include etc/extra/httpd-userdir.conf
/opt/lampp/etc/extra/httpd-userdir.conf を開いて修正する
# Settings for user home directories
#
# Required module: mod_userdir

#
# UserDir: The name of the directory that is appended onto a user's home
# directory if a ~user request is received.  Note that you must also set
# the default access control for these directories, as in the example below.
#
UserDir "/home/*/public_html"

#
# Control access to UserDir directories.  The following is an example
# for a site where these directories are restricted to read-only.
#
<Directory "/home/*/public_html">
    AllowOverride FileInfo AuthConfig Limit Indexes
    Options MultiViews Indexes SymLinksIfOwnerMatch IncludesNoExec
    <Limit GET POST OPTIONS>
        Order allow,deny
        Allow from all
    </Limit>
    <LimitExcept GET POST OPTIONS>
        Order deny,allow
        Deny from all
    </LimitExcept>
</Directory>
Puppy Linuxにはユーザーとか無いみたいなので、
自分でルートの下にhomeディレクトリを作って、その中に、
ユーザーディレクトリを作ってその中にpublic_htmlディレクトリを作って、
その中にindex.hemlとかを作っておく。
アクセスするには、
http://127.0.0.1/~ユーザーディレクトリ/ と入力する。
他のPCからもアクセスできた。
XAMPP セキュリティ
/opt/lampp/lampp security でパスワードの設定した。
何も考えずに設定していたら、

何も考えずに設定していたら、
http://127.0.0.1にアクセスするとパスワードを聞いてきた。

ユーザー名が何だったか忘れたが、
lampp だった。
lampp だった。
登録:
投稿 (Atom)